Commercial Hydronic Radiators
Model RS2
Column Radiators

Model RS2
 |
 |
 |
 |
 |
 |
Product Specifications
General:
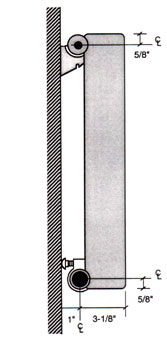
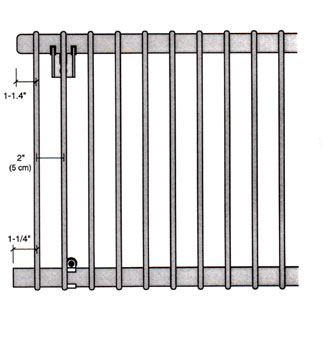
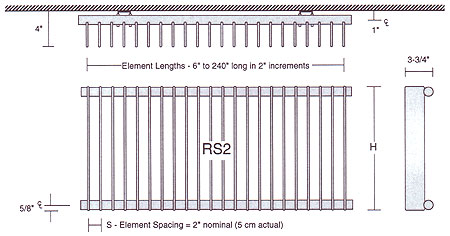
Provide steel column style radiators of lengths and in locations as indicated, and of capacities, style and having accessories as scheduled. The wall hung heating column radiation shall be of one-piece all-welded steel construction, consisting of vertical flattened water tubes welded to horizontal round headers at the top and bottom. Spacing between the vertical water tubes shall be 2” nominal; and the radiator shall be available in 16”, 24”, 30”, 78”, or 84” nominal heights, as scheduled on the plans.
The headers shall include all necessary inlet, outlet and vent connections as required. Standard connection sizes are ó” NPT tapered thread for supply and return piping, and 1/8” for the vent connection. Internal baffling is provided where required for proper water flow.
The radiant heating panels shall be available in lengths from 4” to 20’-0” in two inch even increments without the need for splicing. The panel radiation shall be capable of being mounted to typical stud wall construction without additional blocking or strapping. Appropriate wall mounting brackets shall be provided with the radiation.
The column radiation shall be manufactured in the USA.
ALTERNATE:
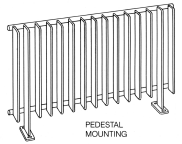
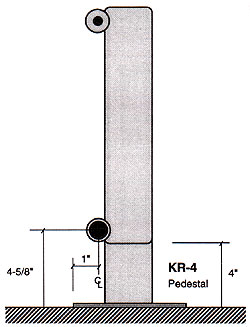
The RS2 column radiators shall be provided with welded-on pedestal supports for floor mounting. The pedestals shall provide for a 4” clearance beneath the radiator.
Pressure Ratings:
Pressure ratings for the radiation shall be as follows:
STANDARD: Working pressure-56 PSI maximum, Test Pressure-74 PSI maximum
OR
HIGH: Working pressure-128 PSI maximum, Test Pressure- 184 PSI maximum
Column radiation expansion shall not exceed 1/64” per foot of radiation at 215ºF. The installer shall provide adequate expansion compensation for each radiator.
Finishes:
The column radiation shall be cleaned and phosphatized in preparation for the powder coat finish. The radiation is then finish painted with a gloss powder coat finish, for a total paint thickness of 2-3 mils (0.002” – 0.003”). The color shall be selected form the Runtal’s standard colors, or optional colors shall be available at an additional cost.
Warranty:
All Runtal radiators are covered by a 5-Year Limited Warranty.
Manufacturer:
Subject to compliance with requirements, provide column radiation as manufactured by Runtal North America, Inc.
OPTIONAL ITEMS WHICH MAY BE ADDED TO THE SPECIFICATION:
The radiation manufacturer shall provide combination shutoff valve/union fitting of less than two inches in width for the supply and return to each panel radiator, to be field installed by others.
Runtal-Flex connectors shall be used where appropriate to provide expansion compensation for the radiators.
Model Type RS2
Quick Specifications
Column Radiator Specification
|
|
BTUH/ft Ratings
| Energy efficient as well as space saving, RS2 column radiators provide more comfort at a lower room temperature than convective heaters. Various average water temperatures are shown here for convenience, but for more specific conditions use the appropriate correction factor with the 215°F rating. Please refer to the technical pages for the correction factor best suited to the design conditions. |
|
||||||||||||||||||||||||||||||||||||||||||||||||
Heating Capacity
Model Type RS2
BTUH/ft Ratings

| MODEL TYPE |
HEIGHT H |
BTUH/FT OUTPUT @ LISTED AWT & 65°F EAT | DRY WT lbs/ft |
||||||||
| 215°F | 190 | 180 | 170 | 160 | 150 | 140 | 130 | 120 | |||
| RS2-16 | 15-7/8″ | 1380 | 1083 | 960 | 863 | 758 | 654 | 540 | 461 | 371 | 9.8 |
| RS2-24 | 23-5/8″ | 1920 | 1507 | 1320 | 1200 | 1054 | 910 | 780 | 641 | 516 | 13.4 |
| RS2-30 | 29-1/2″ | 2280 | 1790 | 1620 | 1425 | 1252 | 1081 | 900 | 762 | 613 | 16.1 |
| RS2-36 | 35-5/8″ | 2640 | 2072 | 1860 | 1650 | 1450 | 1251 | 1080 | 882 | 710 | 18.8 |
| RS2-78 | 78-3/4″ | 6300 | 4946 | 4380 | 3938 | 3459 | 2989 | 2520 | 2104 | 1695 | 38.6 |
| RS2-84 | 84-5/8″ | 6780 | 5322 | 4740 | 4238 | 3722 | 3214 | 2700 | 2265 | 1824 | 40.5 |
NOTE: Heat Outputs for various AWT’s include 15% Heat Effect for placement along outside walls. Use the 215° F Output Rating with the Correction Factor for more specific design conditions.
Correction Factors
Correction Factors
| EAT | |||||||||||
| AWT | 45°F | 50°F | 55°F | 60°F | 65°F | 70°F | 75°F | 80°F | 85°F | 90°F | 95°F |
| 240°F | 1.365 | 1.350 | 1.304 | 1.266 | 1.220 | 1.171 | 1.124 | 1.086 | 1.039 | 1 | 0.953 |
| 235°F | 1.343 | 1.305 | 1.267 | 1.219 | 1.171 | 1.124 | 1.086 | 1.038 | 1 | 0.952 | 0.910 |
| 230°F | 1.305 | 1.267 | 1.219 | 1.171 | 1.124 | 1.086 | 1.038 | 1 | 0.952 | 0.910 | 0.868 |
| 225°F | 1.267 | 1.219 | 1.171 | 1.124 | 1.086 | 1.038 | 1 | 0.952 | 0.910 | 0.868 | 0.826 |
| 220°F | 1.219 | 1.171 | 1.124 | 1.086 | 1.038 | 1 | 0.952 | 0.910 | 0.868 | 0.826 | 0.785 |
| 215°F | 1.171 | 1.124 | 1.086 | 1.038 | 1 | 0.952 | 0.910 | 0.868 | 0.826 | 0.785 | 0.744 |
| 210°F | 1.124 | 1.086 | 1.038 | 1 | 0.952 | 0.910 | 0.868 | 0.826 | 0.785 | 0.744 | 0.704 |
| 205°F | 1.086 | 1.038 | 1 | 0.952 | 0.910 | 0.868 | 0.826 | 0.785 | 0.744 | 0.704 | 0.664 |
| 200°F | 1.038 | 1 | 0.952 | 0.910 | 0.868 | 0.826 | 0.785 | 0.744 | 0.704 | 0.664 | 0.625 |
| 195°F | 1 | 0.952 | 0.910 | 0.868 | 0.826 | 0.785 | 0.744 | 0.704 | 0.664 | 0.625 | 0.587 |
| 190°F | 0.952 | 0.910 | 0.868 | 0.826 | 0.785 | 0.744 | 0.704 | 0.664 | 0.625 | 0.587 | 0.549 |
| 185°F | 0.910 | 0.868 | 0.826 | 0.785 | 0.744 | 0.704 | 0.664 | 0.625 | 0.587 | 0.549 | 0.511 |
| 180°F | 0.868 | 0.826 | 0.785 | 0.744 | 0.704 | 0.664 | 0.625 | 0.587 | 0.549 | 0.511 | 0.474 |
| 175°F | 0.826 | 0.785 | 0.744 | 0.704 | 0.664 | 0.625 | 0.587 | 0.549 | 0.511 | 0.474 | 0.438 |
| 170°F | 0.785 | 0.744 | 0.704 | 0.664 | 0.625 | 0.587 | 0.549 | 0.511 | 0.474 | 0.438 | 0.403 |
| 165°F | 0.744 | 0.704 | 0.664 | 0.625 | 0.587 | 0.549 | 0.511 | 0.474 | 0.438 | 0.403 | 0.369 |
| 160°F | 0.704 | 0.664 | 0.625 | 0.587 | 0.549 | 0.511 | 0.474 | 0.438 | 0.403 | 0.369 | 0.334 |
| 155°F | 0.664 | 0.625 | 0.587 | 0.549 | 0.511 | 0.474 | 0.438 | 0.403 | 0.369 | 0.334 | 0.301 |
| 150°F | 0.625 | 0.587 | 0.549 | 0.511 | 0.474 | 0.438 | 0.403 | 0.369 | 0.334 | 0.301 | 0.269 |
| 145°F | 0.587 | 0.549 | 0.511 | 0.474 | 0.438 | 0.403 | 0.369 | 0.334 | 0.301 | 0.269 | 0.237 |
| 140°F | 0.549 | 0.511 | 0.474 | 0.438 | 0.403 | 0.369 | 0.334 | 0.301 | 0.269 | 0.237 | 0.207 |
| 135°F | 0.511 | 0.474 | 0.438 | 0.403 | 0.369 | 0.334 | 0.301 | 0.269 | 0.237 | 0.207 | 0.177 |
| 130°F | 0.474 | 0.438 | 0.403 | 0.369 | 0.334 | 0.301 | 0.269 | 0.237 | 0.207 | 0.177 | 0.149 |
| 125°F | 0.438 | 0.403 | 0.369 | 0.334 | 0.301 | 0.269 | 0.237 | 0.207 | 0.177 | 0.149 | 0.122 |
| 120°F | 0.403 | 0.369 | 0.334 | 0.301 | 0.269 | 0.237 | 0.207 | 0.177 | 0.149 | 0.122 | 0.096 |
| 115°F | 0.369 | 0.334 | 0.301 | 0.269 | 0.237 | 0.207 | 0.177 | 0.149 | 0.122 | 0.096 | 0.071 |
| 110°F | 0.334 | 0.301 | 0.269 | 0.237 | 0.207 | 0.177 | 0.149 | 0.122 | 0.096 | 0.071 | 0.50 |
| 105°F | 0.301 | 0.269 | 0.237 | 0.207 | 0.177 | 0.149 | 0.122 | 0.096 | 0.071 | 0.50 | 0.030 |
| 100°F | 0.269 | 0.237 | 0.207 | 0.177 | 0.149 | 0.122 | 0.096 | 0.071 | 0.50 | 0.030 | 0.011 |
| EXAMPLE: | To find the BTUH/ft Rating for an RF-4 Panel at 145°F AWT and 65°F EAT, Multiply the Correction Factor (0.438) by the BTUH/ft Rating at 215°F (1351), e.g. (0.438) X (1351) = 592 BTUH/ft |
Flow Rates
How To Determine Flow Rates
The flow rate through a Runtal radiator (or series of radiators) is dependent on the length of the radiator (or combined length of the radiator series), and the design Entering Water Temperature (EWT) and the design Leaving Water Temperature (LWT).
The designer picks the design EWT and LWT. For example, he might pick 170°F as the EWT and 150°F as the LWT. The median point between these two temperatures is called the Average Water Temperature (AWT), and in this example the AWT is 160°F.
The Runtal Heating Capacity charts are based on the heating capacity per foot of radiator, based on the designer’s chosen AWT, and this heating capacity per foot is expressed in units of BTUH/FT @ a given AWT. The required flow rate (GPM) is figured as follows:
Flow Rate = (Heating Capacity/Foot X Radiator Length)
DT –LWT) X 500]
The (EWT – LWT) is commonly referred to as the “Delta T”, or “DT”.
Therefore, our Flow Rate formula becomes:
GPM = (BTUH/FT X FT of Radiator) DT (DT X 500)
As an example, let’s say our designer needs 445 BTUH/FT capacity, over a
10′-0″ span of wall, and has chosen the design water temperatures as EWT = 170°F, and LWT = 150°F. This means our AWT is 160°F. Looking in the Runtal type “R” radiator Heating Capacity chart, we see that an R-4 radiator gives us the required 445 BTUH/FT at 160°F AWT. Therefore, the required flow rate for the 10′-0″ long R-4 radiator is:
GPM = (445 BTUH/FT X 10FT) DT (20°F DT X 500) = 0.445 GPM
Note that there are various combinations of EWT and LWT that can result in the same AWT. In our example above, for instance, a 180°F EWT and a 140°F LWT result in the same 160°F AWT. With Runtal’s unique flattened water tube design, Delta T’s of up to 60°F are possible without concern that the flow rate is too low for heat transfer.
As for a maximum flow rate for Runtal radiators, we recommend no more that 1.5 GPM per water tube. For our R-4 example above, this would mean a maximum flow rate of 6 GPM for an opposite end piped radiator, or 3 GPM for a same end piped radiator.
Piping Options
Piping Details
B Type Connections
|
C Type Connections
|
|||||||||
E Type Connections
|
Opposite End Series
|
|
|
|
Pressure Drop Calculation
Model Type RS2
Pressure Drop Calculation
Please contact your local Runtal Representative for the Pressure Drop through an RS2 radiator, or series of RS2 radiators. The Pressure Drop for this style radiator is dependent on flow rate, the length of the RS2 radiator, and whether the radiator is a stand-alone radiator or part of a series of RS2 radiators, and so needs to be calculated for each application.
In general, short stand-alone RS2 radiators typically will have a Pressure Drop in the range of under 0.50 feet of head, while long stand-alone RS2 radiators will typically have a Pressure Drop in the range of up to 2.50 feet of head.
Pressure Ratings
Pressure ratings for the radiation shall be as follows:
STANDARD: Working pressure-56 PSI maximum, Test Pressure-74 PSI maximum
Column radiation expansion shall not exceed 1/64” per foot of radiation at 215ºF. The installer shall provide adequate expansion compensation for each radiator.
Mounting Systems
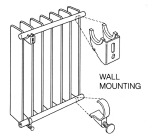
| Continuous wall mounting is standard on all RS2 column radiators. Free standing pedestal mounting is optional. Please see the RS2 technical pages for more complete mounting details. |
|
|
Wall Mounting
Model Type RS2
Wall Mounting
| RS2 Models (back view) | |
| 1-1/2″ |  |
|
For Radiators |
6” to 60″ Long – Use 2 K70 Brackets, one at each end |
|
|
62″ to 138″ Long – Use 3 K70 Brackets, one at each end, one at the center |
|
|
140″ to 236″ Long – Use 4 K70 Brackets, one at each end, two distributed evenly in the middle |
| 238″ to 240″ Long – Use 5 K70 Brackets, one at each end, three distributed evenly in the middle |
|
|
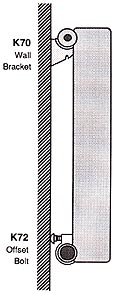
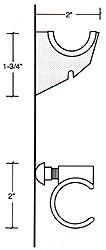 |
K70 Wall Bracket – Support Bracket used at the top header of the Radiator
K72 Offset Bolt – Carriage Bolt assembly pressed onto the bottom header of the Radiator for leveling with the wall. |
Floor Mounting
Model Type RS2
Floor Mounting
| RS2 Models |
 |
|
For Radiators |
6” to 60″ Long – There are 2 KR-4 Pedestals, one at each end |
| 62″ to 138″ Long – There are 3 KR-4 Pedestals, one at each end, one at the center | |
| 140″ to 236″ Long – There are 4 KR-4 Pedestals, one at each end, two in the middle | |
| 238″ to 240″ Long – There are 5 KR-4 Pedestals, one at each end, three in the middle |
|
|
KR-4 Base Plate Detail
|
Colors & Finishes
The column radiation shall be cleaned and phosphatized in preparation for the powder coat finish. The radiation is then finish painted with a gloss powder coat finish, for a total paint thickness of 2-3 mils (0.002” – 0.003”). The color shall be selected form the Runtal’s standard colors, or optional colors shall be available at and additional cost.
Valves & Flex Connections
Warranty
All Runtal radiators are covered by a 5-Year Limited Warranty.
Radiator Installation Instructions
- Radiators are boxed together in as few crates as possible. A box of brackets is included as a separate piece, and it is marked by bright taping. Inside the crates, each panel is wrapped in foam sheeting. Saving this foam to re-wrap the panel once it is wall mounted will protect it from construction site damage.
- Each radiator is tagged with a label that indicates the project name, model type, color, connection code, and tag number. The tag number will usually designate a floor level and room number for easier placement on the job. Locate each radiator as required.
- Carefully place each radiator face down on a smooth level surface. If possible, expose the top header at the selected mounting locations without unwrapping the radiator. Locate the correct number of K70 brackets at stud locations (approximately one bracket every 3 to 6 feet), with a bracket at each end of the radiator. Allow a minimum of 3 inches below each column radiator to facilitate cleaning and to assure proper output. Attach each K70 bracket with a lag screw or bolt. With the radiator still face down, snap the K72 offset bracket onto the bottom header pipe. Hang the panel onto the K70 brackets to determine if the K72 offset bracket bolts are properly adjusted. Check that the panel is level and plumb. Once the panel is adjusted to the correct position, remove it from the wall and tighten up the bracket bolts. Use 2 bolts per K70 bracket.
- With the radiator face down, remove the plastic plugs from all tappings. Thread the supply and return fittings into the ½”NPT tappings on the column radiator. The sealing tape or pipe dope used is the installer’s choice – make sure the connections are leak tight. Use the foam wrapping as a pad for the face of the radiator when tightening up the fittings. Each radiator needs to be fitted with a 1/8”NPT air vent prior to filling and startup.
- For pedestal mounted column radiators, place the radiator in the proper position with respect to the window or wall and locate the bolt holes in the pedestal baseplates on the floor. After threading the needed piping adapters into the radiator and running the supply and return piping to the adapters, bolt down the pedestals to the floor and securely attach all the piping.
- Radiators expand a maximum of 0.016 inch per linear foot of length if heated to 215°F. Piping attached to the radiator must provide the necessary expansion compensation. Flexible piping and elbowed piping are two simple ways to provide the flexibility required. Black iron pipe, copper tubing, coiled soft copper, and PEX piping (with 215°F Rating) can be used. A typical radiator connection usually incorporates a union (can be dielectric, but it is not required) and an isolation valve (radiator union valve, or union ball valve), but often they are “hard piped” in place. Paint any exposing piping as required with the touch-up provided.
- Once the radiators are installed, the system can be tested to 50 psi. DO NOT OVERPRESSURIZE THE RADIATORS as permanent damage may be occur.
- Standard Column Radiators: Maximum 56 psi
- When the system has been shown to hold 50 psi maximum air, the piping and radiators can be filled with water. As water fills the system and radiators, air is forced to the vent fittings. Vent as much air as possible before turning on the circulating pump(s).
- When the system is filled, operate the circulator(s) to force the remaining air to the high points of the system. With the system pressurized, turn off the circulator(s) to vent the panels. Each radiator should be individually bled of air. Once cold venting has been completed, heat the system to design temperature and repeat the venting procedure.
Operation & Maintenance
Operation & Maintenance
For RS2 Models
Hydronic Radiator Operation
- Radiators are manufactured in the USA of cold rolled low carbon steel and should be used only in closed hydronic systems to insure against corrosion of system components.
- Proper radiator operation depends on adequate flow of water to the panel, which can only be accomplished when all the system air has been fully vented from the panels.
- Radiators should each be vented, with the system pressurized but in a static state (pumps off). Venting may need to be done periodically to assure a closed system.
- DO NOT OVER-PRESSURIZE RADIATORS: RS2 radiators are standard pressure construction. Standard pressure column radiators should be tested with no more than 56 psi. 56 psi max (tested at 74 psi)
- Radiators expand a maximum of 0.016 inch per linear foot of length if heated to 215°F. Piping attached to the radiator must provide the necessary expansion compensation.
- Flexible piping and elbowed piping are two simple ways to provide the 1/8 inch to 1/2 inch (typical) of flexibility required in expansion situations (usually series piping).
- Runtal Radiators require less flow rate than other hydronic heating products. If flow noise is apparent, balance the system until the noise is reduced.
- For a delta T of 20°F (T supply minus T return), divide the total Btu/hr capacity of the loop by 10,000. This gives the Flow Rate in gallons per minute (GPM).
- Many levels of control are available today for hydronic systems. Runtal Radiators will provide comfortable, even heating whether operated by a simple thermostat to baseboard loop system, or an advanced boiler reset controller with motorized mixing valves, constant circulation and 2-pipe distribution.
Radiator Maintenance
- Hydronic system maintenance should include routine checks for piping leaks (usually indicated by frequent makeup water), and a yearly diagnosis of the system water pH to evaluate its corrosive potential.
- Internal radiator maintenance depends entirely on the system water makeup and proper venting. Hydronic system additives are available to passivate and protect against freezing. These additives will not significantly reduce the output of Runtal Radiators.
- External radiator maintenance consists of keeping the surfaces clean, and any paint nicks or deep scratches painted with touch-up to prevent any surface rust.
- Radiators can be painted after sanding with fine grit paper to dull the high gloss and by wiping with solvent or a tack rag. Use only oil-based enamel paint (alkyd, acrylic, urethane, epoxy) – do not use latex or lacquer paint. Use urethane or epoxy enamel for radiators located in harsh environments. Spray the paint to achieve an even coating, and let dry completely before heating the radiator.
Product Specifications
General:
Provide steel column style radiators of lengths and in locations as indicated, and of capacities, style and having accessories as scheduled. The wall hung heating column radiation shall be of one-piece all-welded steel construction, consisting of vertical flattened water tubes welded to horizontal round headers at the top and bottom. Spacing between the vertical water tubes shall be 2” nominal; and the radiator shall be available in 16”, 24”, 30”, 78”, or 84” nominal heights, as scheduled on the plans.
The headers shall include all necessary inlet, outlet and vent connections as required. Standard connection sizes are ó” NPT tapered thread for supply and return piping, and 1/8” for the vent connection. Internal baffling is provided where required for proper water flow.
The radiant heating panels shall be available in lengths from 4” to 20’-0” in two inch even increments without the need for splicing. The panel radiation shall be capable of being mounted to typical stud wall construction without additional blocking or strapping. Appropriate wall mounting brackets shall be provided with the radiation.
The column radiation shall be manufactured in the USA.
ALTERNATE:
The RS2 column radiators shall be provided with welded-on pedestal supports for floor mounting. The pedestals shall provide for a 4” clearance beneath the radiator.
Pressure Ratings:
Pressure ratings for the radiation shall be as follows:
STANDARD: Working pressure-56 PSI maximum, Test Pressure-74 PSI maximum
Column radiation expansion shall not exceed 1/64” per foot of radiation at 215ºF. The installer shall provide adequate expansion compensation for each radiator.
Finishes:
The column radiation shall be cleaned and phosphatized in preparation for the powder coat finish. The radiation is then finish painted with a gloss powder coat finish, for a total paint thickness of 2-3 mils (0.002” – 0.003”). The color shall be selected form the Runtal’s standard colors, or optional colors shall be available at and additional cost.
Warranty:
All Runtal radiators are covered by a 5-Year Limited Warranty.
Manufacturer:
Subject to compliance with requirements, provide column radiation as manufactured by Runtal North America, Inc.
OPTIONAL ITEMS WHICH MAY BE ADDED TO THE SPECIFICATION:
The radiation manufacturer shall provide combination shutoff valve/union fitting of less than two inches in width for the supply and return to each panel radiator, to be field installed by others.
Runtal-Flex connectors shall be used where appropriate to provide expansion compensation for the radiators.
BTUH/ft Ratings
Heating Capacity
Correction Factors
Flow Rates
How To Determine Flow Rates
The flow rate through a Runtal radiator (or series of radiators) is dependent on the length of the radiator (or combined length of the radiator series), and the design Entering Water Temperature (EWT) and the design Leaving Water Temperature (LWT).
The designer picks the design EWT and LWT. For example, he might pick 170°F as the EWT and 150°F as the LWT. The median point between these two temperatures is called the Average Water Temperature (AWT), and in this example the AWT is 160°F.
The Runtal Heating Capacity charts are based on the heating capacity per foot of radiator, based on the designer’s chosen AWT, and this heating capacity per foot is expressed in units of BTUH/FT @ a given AWT. The required flow rate (GPM) is figured as follows:
Flow Rate = (Heating Capacity/Foot X Radiator Length)
DT –LWT) X 500]
The (EWT – LWT) is commonly referred to as the “Delta T”, or “DT”.
Therefore, our Flow Rate formula becomes:
GPM = (BTUH/FT X FT of Radiator) DT (DT X 500)
As an example, let’s say our designer needs 445 BTUH/FT capacity, over a
10′-0″ span of wall, and has chosen the design water temperatures as EWT = 170°F, and LWT = 150°F. This means our AWT is 160°F. Looking in the Runtal type “R” radiator Heating Capacity chart, we see that an R-4 radiator gives us the required 445 BTUH/FT at 160°F AWT. Therefore, the required flow rate for the 10′-0″ long R-4 radiator is:
GPM = (445 BTUH/FT X 10FT) DT (20°F DT X 500) = 0.445 GPM
Note that there are various combinations of EWT and LWT that can result in the same AWT. In our example above, for instance, a 180°F EWT and a 140°F LWT result in the same 160°F AWT. With Runtal’s unique flattened water tube design, Delta T’s of up to 60°F are possible without concern that the flow rate is too low for heat transfer.
As for a maximum flow rate for Runtal radiators, we recommend no more that 1.5 GPM per water tube. For our R-4 example above, this would mean a maximum flow rate of 6 GPM for an opposite end piped radiator, or 3 GPM for a same end piped radiator.
Piping Options
Pressure Drop Calculation
Model Type RS2
Pressure Drop Calculation
Please contact your local Runtal Representative for the Pressure Drop through an RS2 radiator, or series of RS2 radiators. The Pressure Drop for this style radiator is dependent on flow rate, the length of the RS2 radiator, and whether the radiator is a stand-alone radiator or part of a series of RS2 radiators, and so needs to be calculated for each application.
In general, short stand-alone RS2 radiators typically will have a Pressure Drop in the range of under 0.50 feet of head, while long stand-alone RS2 radiators will typically have a Pressure Drop in the range of up to 2.50 feet of head.
Pressure Ratings
Pressure ratings for the radiation shall be as follows:
STANDARD: Working pressure-56 PSI maximum, Test Pressure-74 PSI maximum
Column radiation expansion shall not exceed 1/64” per foot of radiation at 215ºF. The installer shall provide adequate expansion compensation for each radiator.
Mounting Systems
Wall Mounting
Floor Mounting
Finishes
The column radiation shall be cleaned and phosphatized in preparation for the powder coat finish. The radiation is then finish painted with a gloss powder coat finish, for a total paint thickness of 2-3 mils (0.002” – 0.003”). The color shall be selected form the Runtal’s standard colors, or optional colors shall be available at and additional cost.
Valves & Flex Connections
Warranty
All Runtal radiators are covered by a 5-Year Limited Warranty.
Radiator Installation Instructions
- Radiators are boxed together in as few crates as possible. A box of brackets is included as a separate piece, and it is marked by bright taping. Inside the crates, each panel is wrapped in foam sheeting. Saving this foam to re-wrap the panel once it is wall mounted will protect it from construction site damage.
- Each radiator is tagged with a label that indicates the project name, model type, color, connection code, and tag number. The tag number will usually designate a floor level and room number for easier placement on the job. Locate each radiator as required.
- Carefully place each radiator face down on a smooth level surface. If possible, expose the top header at the selected mounting locations without unwrapping the radiator. Locate the correct number of K70 brackets at stud locations (approximately one bracket every 3 to 6 feet), with a bracket at each end of the radiator. Allow a minimum of 3 inches below each column radiator to facilitate cleaning and to assure proper output. Attach each K70 bracket with a lag screw or bolt. With the radiator still face down, snap the K72 offset bracket onto the bottom header pipe. Hang the panel onto the K70 brackets to determine if the K72 offset bracket bolts are properly adjusted. Check that the panel is level and plumb. Once the panel is adjusted to the correct position, remove it from the wall and tighten up the bracket bolts. Use 2 bolts per K70 bracket.
- With the radiator face down, remove the plastic plugs from all tappings. Thread the supply and return fittings into the ½”NPT tappings on the column radiator. The sealing tape or pipe dope used is the installer’s choice – make sure the connections are leak tight. Use the foam wrapping as a pad for the face of the radiator when tightening up the fittings. Each radiator needs to be fitted with a 1/8”NPT air vent prior to filling and startup.
- For pedestal mounted column radiators, place the radiator in the proper position with respect to the window or wall and locate the bolt holes in the pedestal baseplates on the floor. After threading the needed piping adapters into the radiator and running the supply and return piping to the adapters, bolt down the pedestals to the floor and securely attach all the piping.
- Radiators expand a maximum of 0.016 inch per linear foot of length if heated to 215°F. Piping attached to the radiator must provide the necessary expansion compensation. Flexible piping and elbowed piping are two simple ways to provide the flexibility required. Black iron pipe, copper tubing, coiled soft copper, and PEX piping (with 215°F Rating) can be used. A typical radiator connection usually incorporates a union (can be dielectric, but it is not required) and an isolation valve (radiator union valve, or union ball valve), but often they are “hard piped” in place. Paint any exposing piping as required with the touch-up provided.
- Once the radiators are installed, the system can be tested to 50 psi. DO NOT OVERPRESSURIZE THE RADIATORS as permanent damage may be occur.
- Standard Column Radiators: Maximum 56 psi
- When the system has been shown to hold 50 psi maximum air, the piping and radiators can be filled with water. As water fills the system and radiators, air is forced to the vent fittings. Vent as much air as possible before turning on the circulating pump(s).
- When the system is filled, operate the circulator(s) to force the remaining air to the high points of the system. With the system pressurized, turn off the circulator(s) to vent the panels. Each radiator should be individually bled of air. Once cold venting has been completed, heat the system to design temperature and repeat the venting procedure.
Operation & Maintenance
For RS2 Models
Hydronic Radiator Operation
- Radiators are manufactured in the USA of cold rolled low carbon steel and should be used only in closed hydronic systems to insure against corrosion of system components.
- Proper radiator operation depends on adequate flow of water to the panel, which can only be accomplished when all the system air has been fully vented from the panels.
- Radiators should each be vented, with the system pressurized but in a static state (pumps off). Venting may need to be done periodically to assure a closed system.
- DO NOT OVER-PRESSURIZE RADIATORS: RS2 radiators are standard pressure construction. Standard pressure column radiators should be tested with no more than 56 psi. 56 psi max (tested at 74 psi)
- Radiators expand a maximum of 0.016 inch per linear foot of length if heated to 215°F. Piping attached to the radiator must provide the necessary expansion compensation.
- Flexible piping and elbowed piping are two simple ways to provide the 1/8 inch to 1/2 inch (typical) of flexibility required in expansion situations (usually series piping).
- Runtal Radiators require less flow rate than other hydronic heating products. If flow noise is apparent, balance the system until the noise is reduced.
- For a delta T of 20°F (T supply minus T return), divide the total Btu/hr capacity of the loop by 10,000. This gives the Flow Rate in gallons per minute (GPM).
- Many levels of control are available today for hydronic systems. Runtal Radiators will provide comfortable, even heating whether operated by a simple thermostat to baseboard loop system, or an advanced boiler reset controller with motorized mixing valves, constant circulation and 2-pipe distribution.
Radiator Maintenance
- Hydronic system maintenance should include routine checks for piping leaks (usually indicated by frequent makeup water), and a yearly diagnosis of the system water pH to evaluate its corrosive potential.
- Internal radiator maintenance depends entirely on the system water makeup and proper venting. Hydronic system additives are available to passivate and protect against freezing. These additives will not significantly reduce the output of Runtal Radiators.
- External radiator maintenance consists of keeping the surfaces clean, and any paint nicks or deep scratches painted with touch-up to prevent any surface rust.
- Radiators can be painted after sanding with fine grit paper to dull the high gloss and by wiping with solvent or a tack rag. Use only oil-based enamel paint (alkyd, acrylic, urethane, epoxy) – do not use latex or lacquer paint. Use urethane or epoxy enamel for radiators located in harsh environments. Spray the paint to achieve an even coating, and let dry completely before heating the radiator.


